Showing posts with label Technical File. Show all posts

Wednesday, 25 November 2015

Practice Hybrid

Despite having to make 2 prosthetic pieces I really wanted to do a run through of my whole design so I would know what I needed to fix or add to my final look. I am so glad I had done this even though my tutors questioned whether it was a good idea and maybe I should use that as my final, but I had added so much to help bring the look together.

I started of by applying my piece bit by bit so applying the prosaid to both sides a section by section, this was such a good idea when doing a big piece like I had done mainly because the sides didn't stick down to each other and it gave me a more precise application process.


I sort of like the way I applied the piece but some sections of it split from the baldez mainly because I think I made it too hard as I didn't put a great deal of deadner in it, so for my next one I am going to make the piece a lot softer so this wont happen. I also didn't apply it very straight so it has kind of bubbled near the eyebrow.
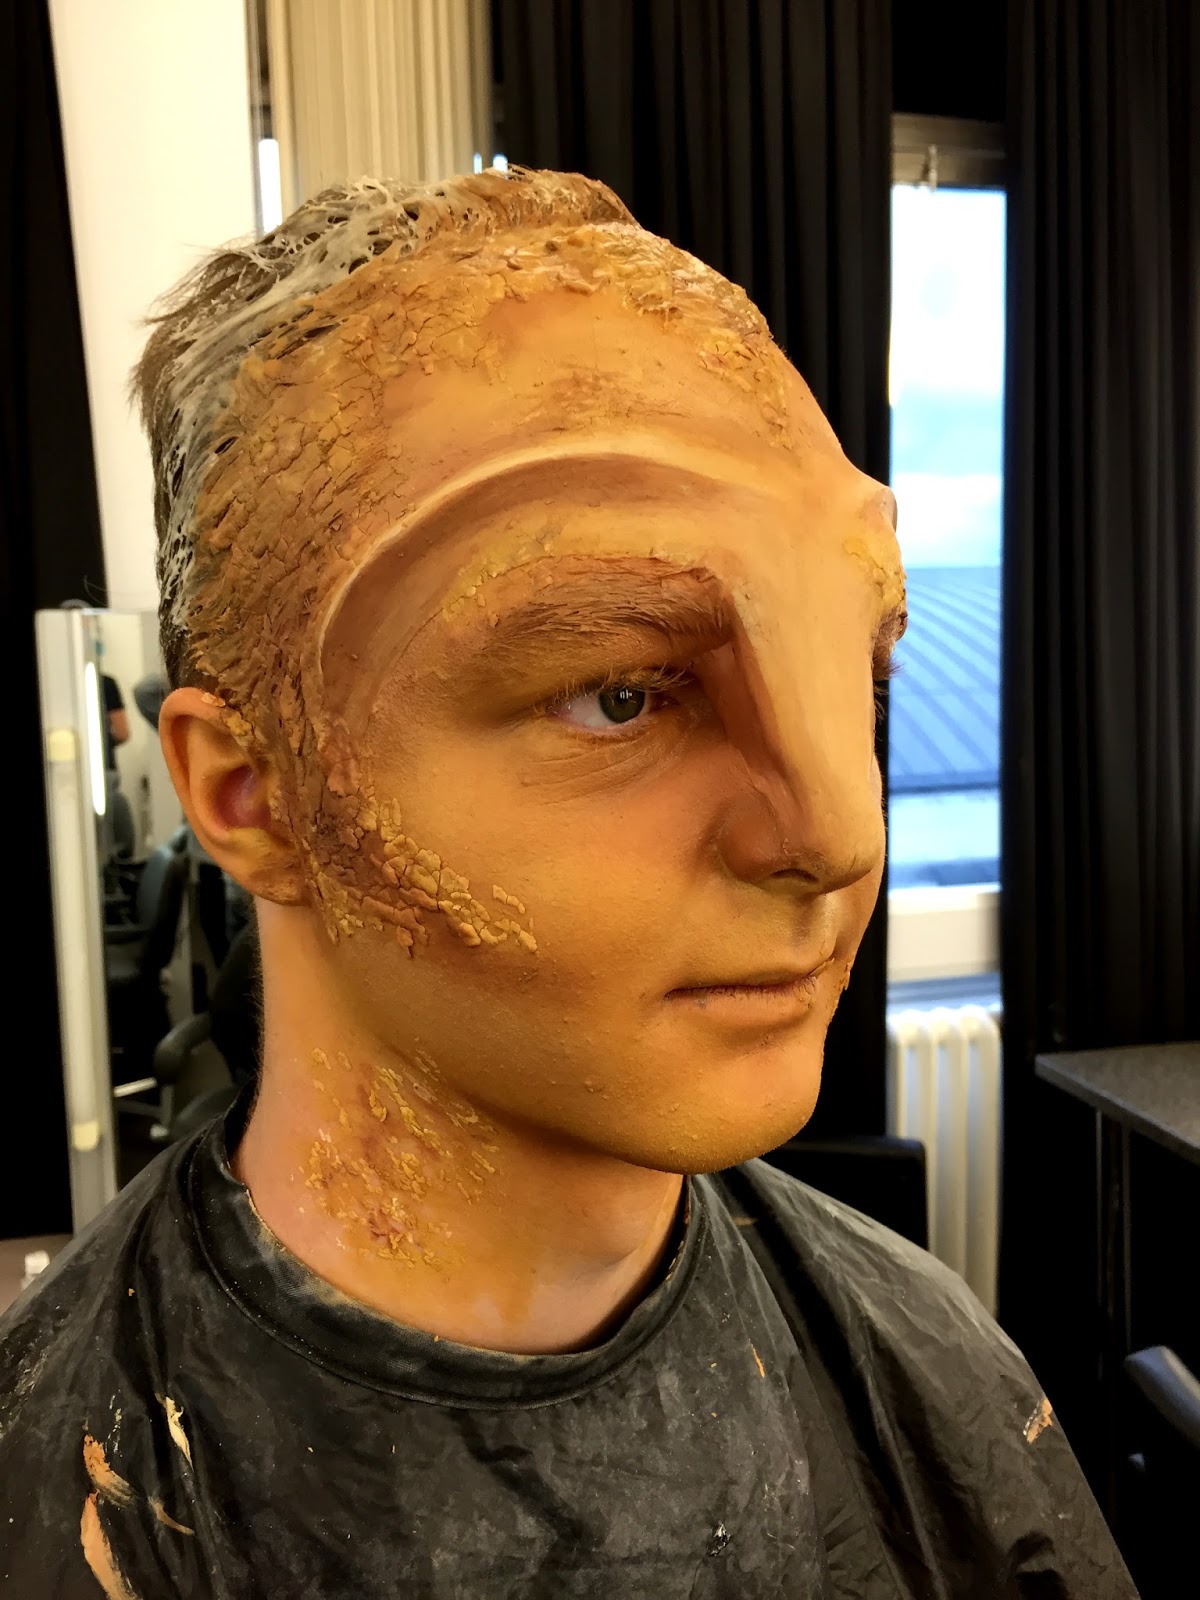


The colouring I am really pleased with and it's exactly the shade that I have hoped for but as my inital design asked for more than one prosthetic piece but I realised I cant do that I am going to build the forehead and block the eyebrows out using cinewax. I have used it before and although slightly awkward to use it does have a good effect. Obviously I am also going to the chest as my model is not actually wearing anything for his top half.

Things I am going to change for my final:

Make a softer piece
Apply the piece straight and not bent near the eyebrow
Block out the eyebrows either using wax or glue
Build up the forehead using wax


How To Use A Bald Cap.

I wasn't actually using this technique for my final look but thought it would be really useful to look into for future reference, none of the photos posted are mine but they are my class mates, I mainly put them on here so if I ever come back to it I'll have a visual reference point to look at.

Pre Impression caps you melt with acetone.
Rubber caps you blend with latex.
Watermelon you melt with alcohol.

1. Clean the models face making sure not to moisturise.
2. Wet all the hair and scrape back using gel in a criss cross shape at the back of the head.
3. When the hair is all scraped back apply the cap, using the models assistance.
4. Trim all around the cap just behind the ear and an inch or so away from the hair line.
5. Glue the edges down using prosaid or spirit gum.
6. When glueing the back down make sure the model has their head forward so the neck is stretched.
7. Melt the sides down using acetone.
8. If making them completely bald make sure you cancel out the dark tones in the hair by using a red/pink and then applying the foundation over the top.

BELOW PICTURES ARE NOT ANY OF MY WORK BUT I INCLUDED THEM FOR PERSONAL FUTURE REFERENCE IF I NEED IT.

Saturday, 14 November 2015

Making My Hybrid Mould + Silicone

For my bearded dragon I originally wanted to make a few pieces but have then come to realise that not only do I not have enough silicone but I cant overlay them and my idea was to cross them over. The piece that I went for in the end was the eyebrow and down the nose section, I measured my models face and then started on sculpting my design, below is how it looked before I cast it.


 My first attempt of casting went awful, it was all going smoothly but the problem was when it came to mixing the silicones, I didn't mix them together enough so only certain areas set and some didn't, below is what my failed attempted looked like.


So, before I thought I didn't have enough silicone, now after having to remake my main piece, I REALLY didn't have enough silicone, never the less I got it done and below is my silicone mould with the piece actually setting in it. This time, both the mould and the piece came out well. The only issue is, is that I think I made my initial mould slightly wonky as some areas are a lot thinner than the other this became an issue when applying my piece and some of it split luckily this was only on my practice and when I made my second silicone piece I tried to keep as much as the silicone in that area when scraping over the top.


Saturday, 24 October 2015

Final Look

Finally! This is how my character looked in my head. My practice and final
can't even compete, this one is just so much more suited to what I was going for and what the guidelines asked from me. An obvious criticism that sticks out to me would be the black eye, I feel the flash really bleached it out and it doesn't have as much impact as it does in real life. Never the less I am really happy with how this has come out.


Practice

Once I found out how I was going to remove the wound and apply the wound to the body and make the edges look seamless I was able to start practising. This was my first attempt.

At first everything was going fine, the application was relatively smooth and the blending went quite well. Until I got to the colouring of the wound, I really don't like anything I have done in my practice attempt, the colouring is too intense and makes it look really fake and really theatrical which wasn't what I had intended. For my final look I am going to make the majority of the wound blend into the skin with only a slight bit of red around the outside to represent the swollen skin, and more of the darker red tone inside the wound itself. Another issue was that my actual face make up was too caked on and didn't look as natural as I wanted it to, again, too theatrical. Next time I am leaving my model base free and only slightly emphasising the under eye bags and sores on noes and hollowed cheeks. The thing that I though was really successful was the black eye - I really like how that came out, it looks natural but against the extremely pale thick complexion makes it look fake. I'm also not happy with the hair (bottom picture) I think I am going to do it more of a mid length pony tail with bits of hair hanging down. Either way, I am very glad I don't have to use this as my final outcome as it definitely doesn't suit the idea in my head.


Thursday, 15 October 2015

How to Cast Your Silicone Mould.

EQUIPMENT

3/4  Measuring cups
Glue gun
Fixing spray
Petrolise
Cling film
Scales
Silicone A
Silicone B
Old brushes
Deadner
Pigment (if desired)
Many sets of gloves
Baldez
Isopropanol


SILICONE MOULD

1. Spray with fixing spray.
2. Spray with petrolise
3. Cut a measuring cup in half and glue down around the mould and seal  and edges with glue gun.
4. Making sure scales and work surface are covered with cling film.
5. Measure silicones, 30g x 30g (Depending on size but both silicones have to be the same) changing gloves and sticks between them both.
6. Mix together,
7. Pour over sculpture in back and fourth motion
WAIT UNTIL DRY (1 HOUR)


ACTUAL WOUND

1. Remove silicone from mould.
2. Clean with isopropanol.
3. Spray mould with petrolise
4. Super baldez 1:2 Isoprpanol.
5. 2/3 layers of baldez - making sure to go wider than the wound so it replicates skin.
6. Leave to dry between each layer.
7. 8g of A
    8g of B
    10/12g of Deadner depending on area of skin, for a softer area like face you'd use more deadner
Using these as a basic measurement you can work out how much you would need to make depending on the size of the wound you are filling.
8. Add pigment.
9. Fill the mould and using a straight edge scrape over the top.
10. Let to dry.

Below are my casts being created and finished, I have yet to take them out the moulds as I don't know how I would do that as of yet.