Anatomy.jpg Photo by Waldo | Photobucket. 2015 at:
http://smg.photobucket.com/user/waldo_20012001/media/anatomy.jpg.html.
[Accessed 29 November 2015].
Photo [ONLINE] Available at: http://www.thereptiledungeon.freeservers.com/mvc-273f.jpg.
[Accessed 29 November 2015]
General Info - Care of Bearded Dragons (Pogona vitticeps). 2015 Available at:http://beardeddragoncaresheet.weebly.com/general-info.html.
[Accessed 29 November 2015].
Drac - Alien Species Wiki - Aliens, UFOs, Space aliens Available at: http://aliens.wikia.com/wiki/Drac.
[Accessed 29 November 2015].
Enemy Mine (1985) - IMDb. 2015. Enemy Mine (1985) Available at:http://www.imdb.com/title/tt0089092/.
[Accessed 29 November 2015].
John Chambers - Telegraph. 2015. John Chambers Available at:http://www.telegraph.co.uk/news/obituaries/1340456/John-Chambers.html.
[Accessed 14 November 2015].
Photo [ONLINE] Available at: https://upload.wikimedia.org/wikipedia/commons/4/43/Outback.JPG.
[Accessed 02 November 2015].
Photo [ONLINE] Available at: http://www.genesispark.com/wp-content/uploads/2011/11/Thorny-Devil.jpg.
[Accessed 02 November 2015]
Photo [ONLINE] Available at: http://i.dailymail.co.uk/i/pix/2015/07/01/21/145956BC000005DC-0-image-a-17_1435782708094.jpg.
[Accessed 02 November 2015]
Photo [ONLINE] Available at: http://epicful.com/wp-content/uploads/2015/05/frill-necked-lizard-animals-lizards-reptiles-223973-2451x3543.jpg.
[Accessed 02 November 2015]
Photo [ONLINE] Available at: https://amazingpict.com/wp-content/uploads/2015/01/chameleon-green.jpg.
[Accessed 02 November 2015]
BBC Documentary | Plannet Earth Episode 5 : Deserts ( HD Documentary ) - YouTube. 2015 [ONLINE] Available at: https://www.youtube.com/watch?v=S9IzbytEnfE.
[Accessed 02 November 2015]
Siren | Greek mythology | Britannica.com. 2015. [ONLINE] Available at: http://www.britannica.com/topic/Siren-Greek-mythology.
[Accessed 01 November 2015]
Centaur. 2015. [ONLINE] Available at:http://www.greekmythology.com/Myths/Creatures/Centaur/centaur.html.
[Accessed 01 November 2015]
Greek Hybrid Creatures | Mythography. 2015 http://www.mythography.com/myth/welcome-to-mythography/greek-chimerae/hybrids/.
[Accessed 01 November 2015]
Photo [ONLINE] Available at: https://featuredcreature.com/wp-content/uploads/2012/10/The-Sphynx12.jpg.
[Accessed 01 November 2015].
Photo [ONLINE] Available at:http://ligersandtigons.weebly.com/uploads/1/9/3/2/19327997/422239.jpg?479.
[Accessed 01 November 2015].
The Changing Colors of Bruises and What They Mean, Causes, Tests, Diagnosis & Treatment. 2015 at: http://www.symptomfind.com/health/changing-colors-bruises-and-what-they-mean/.
[Accessed 24 October 2015]
How wounds heal: MedlinePlus Medical Encyclopedia. 2015 Available at:https://www.nlm.nih.gov/medlineplus/ency/patientinstructions/000741.htm.
[Accessed 24 October 2015]
The 4-Stage Process Of Wound Healing: Making Skin Stronger Than Before. Available at:http://www.medicaldaily.com/4-stage-process-wound-healing-making-skin-stronger-310872.
[Accessed 24 October 2015].
Photo [ONLINE] Available at: http://monashdentalgroup.com.au/dental-education/images/type-of-teeth.png.
[Accessed 04 October 2015]
Photo [ONLINE] Available at: http://www.biteresistantarmguards.com/IMAGES/bitefromhuman.jpg.
[Accessed 04 October 2015]
Photo [ONLINE] Available at:http://41.media.tumblr.com/78b88e4c4256ea047ca5fe0c033b479d/tumblr_mmv77iiFTs1r8vrhxo1_500.jpg.
[Accessed 04 October 2015]
Photo [ONLINE] Available at: https://s-media-cache-ak0.pinimg.com/736x/57/69/13/576913c54197f827492c977a357e12fe.jpg.
[Accessed 04 October 2015]
Is A Human Bite Worse Than A Dog Bite? - Science Questions, from the Naked Scientists. Available at: http://www.thenakedscientists.com/HTML/questions/question/2597/.
[Accessed 04 October 2015].
A little prosthetic history…part 1 » "if you do what you love and love what you do, you'll never work another day in your life" Available at:http://www.sianjeffriesjones.com/2012/08/29/a-little-prosthetic-history-part-1/.
[Accessed 04 October 2015]
The Phantom of the Opera (1925) Available at:http://www.lonchaney.org/filmography/141.html.
[Accessed 04 October 2015]
History - Makeup - actor, film, movie, name, cinema, scene Available at:http://www.filmreference.com/encyclopedia/Independent-Film-Road-Movies/Makeup-HISTORY.html.
[Accessed 04 October 2015].
Sunday, 29 November 2015
Technical Evaluation
This project was heavily weighted down with learning new
techniques and new terminology along with a whole new set of health and safety
rules. I had learnt a whole new technique on making and adding pieces and
prosthetics to the body.
You first create you're piece out of
plasteline (a non-drying clay) on a non-porous surface when this is done a
barrier is created around the piece to stop any silicone leaking out, a fixing
spray and petrolise are then sprayed onto the design to help release the
silicone mould when set, this should be done with a mask on and near a window.
A solution of silicone A and B, making sure both equal parts and both parts are
mixed thoroughly (I learnt the hard way) is poured over, leaving to set for at
least an hour depending on the size of the design. Remove the mould when
finished and wipe clean with alcohol, a mixture of 1:2 (Super Baldex : Alcohol)
is then applied with a brush, you can do up to 3 layers of this, I found the
thicker the baldez the easier it is to work with. To create the actual wound
itself you measure out a mixture of Silicone A and B and 60% of the total
amount would be deadner – this depends on how soft and skin like you would like
your piece. When applying your piece you apply prosaid adhesive to the skin and
the piece, wait until both sides are clear and then stick down, the baldez
edges are blended out with alcohol. To remove the piece you would need to
purchase prosaid remover and maybe a moisturiser for your model as it can be
very damaging to the skin and it is also quite difficult to remove all the
traces of glue.
Although I didn't use a bald cap I thought it would be important to include it in my technical evaluation because it is something I have learnt Applying a bald cap wasn’t as difficult as I thought it would be – the
hardest part would be the prep and trying to get the hair as flat as possible
to the head using gel and water. You would then ask you’re model to help apply
the bald cap, once it is all in place you trim it. Making sure the models head
is tipped forward when cutting the back. Spirit gum is used to stick the edges
down and isopropanol is used to blend the edges out.
I found majority of these techniques were easy just as soon as you got your head round them, I also felt like I grasped them quite well; the more you practice the easier they all get. I also found out that you have to stay completely on top of things when it comes to listening in class as as soon as you lose focus you will miss a crucial step. In regards to mistakes I made I found that although they were a slight hindrance they made my final work so much better.
I found majority of these techniques were easy just as soon as you got your head round them, I also felt like I grasped them quite well; the more you practice the easier they all get. I also found out that you have to stay completely on top of things when it comes to listening in class as as soon as you lose focus you will miss a crucial step. In regards to mistakes I made I found that although they were a slight hindrance they made my final work so much better.
Evaluation For Brave New World As A Whole
I have thoroughly enjoyed every aspect of this project and it has really opened my eyes to what aspect of hair and make up that I would like to go down. You are given just enough freedom to do what you like but also having enough restraints to have a directed approach and not go too off the rails.Not only that but both aspects to the project were really enjoyable and I rarely felt aspects of it were dire. I did however feel the human hybrid part was very rushed, there was too much time spent on the wound section and not enough time left for the hybrid which I felt would have been better if it wasn't so rushed.
Both aspects I encountered some issues, the first part of the project was my own mistake, which I then learnt from - I coloured the wound wrong, it was too theatrical rather than realistic I also applied too much make up to the face when really the look I was going for was very natural and worn out. Luckily my initial look was just a practice so I could take into consideration what went wrong and make sure it didn't happen in my final look the only criticism I had with my wound character was the lack of depth in the black eye - I feel I could have made it darker and more obvious so the camera flash wouldn't have bleached it out. Although this was very fast paced I feel more time should have been dedicated to the hybrid has it was a much larger portion of the project.
Similarly to my wound I also did a practice attempt at my hybrid, although I was very happy with how my practice had turned out, it just wasn't my exact vision and I knew at the time how I could improve it so I remade my piece and added wax to the forehead to build it up, this definitely pulled my look together and made it what it was. The wax also helped me block out the eyebrows which I thought made my practice look too human like rather than a lizard. Also my flour and water didn't crack at all on the hair so I had to change my design to suit fullers earth going in the hair as I knew that one would crack.
Friday, 27 November 2015
Evaluation For Hybrid
Unlike the wound character I felt my practice for this went quite well, even so I am very pleased that I put in that extra effort to make double the amount of prosthetic pieces because it made such a difference when I had practised it in comparison to my final one. There were too many bits missing or not quite right in the practice attempt for it to be called my final - I was still very happy with how it had looked but I wasn't completely satisfied. I feel the addition of the wax, although not particularly obvious, really made a huge difference, it really brought the look together. Certain aspects of my look I felt needed exaggerating because the flash really bleached them out and that was the cracks in the dry flaky effect. The piece needed highlighting and the cracks needed to be very very dark with a really tiny brush rather than just my shading around the areas. Doing this would have taken up a lot of time and even though there wasn't a time limit on the final look I felt pressured to be done for a certain time because my model had commitments else where. If this wasn't the case I would have gladly taken him back into the chair and painted on all the tiny details that would have really brought the look together and emphasised the dryness. I am still very happy with how it has come out though.

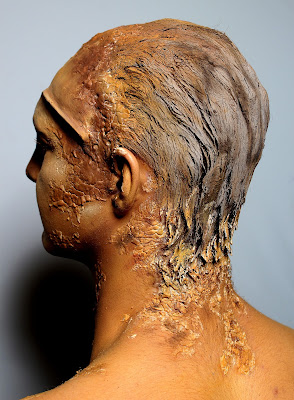


Final Hybrid Look
After my practice I knew exactly what aspects of my look that I needed to change or add, so as for the initial piece I made it a lot softer by adding more deadner to the silicone mix. This helped drastically reduce the splits between the baldez and silicone mixture. Below is a picture of the piece applied to the face with no colouring.


I also applied the piece a lot straighter which helped to stop the edges from splitting.

I also found during my practice that the baldez over the eyebrow helped to block them out, this is why I haven't blended them away in these images. This was concept that I was going to use to help get rid of the eyebrows, but in the end I had a lot of wax left over from building up the forehead that I cancelled them out using this technique. This ended up to be quite difficult but I did it in the end.

Above is the look before it was coloured, this shows the placement of the wax. As you can see it has built up the forehead to help the transition between the skin and the prosthetics piece, not only that but it relates to my idea of having a very wide head, although it's not massively obvious I think it really brings the look together. Again with the eyebrows - my practice didn't look very put together mainly because you could see the eyebrow hair, seeing this may possibly keep the human element to my hybrid but I just saw it as looking quite lazy and scruffy. There is still a lot of element to the look that keep the human part of the hybrid.


And above is my final outcome, I originally tried it on a black background but it really washed out the tone of the skin so I kept with white. I wish I defined my flaking/dry skin a bit more, especially around the forehead.


This was another thing that I forgot to mention in my practice example, was that I had planned to use flour and water for the whole look as well as the hair but in my practice it wasn't cracking on hair so I had to change my design to fullers earth, initially I was going to colour the head but decided against it because the cool tones of the grey in comparison to the warm skin tones worked really well and made for an interesting effect.
Wednesday, 25 November 2015
Practice Hybrid
Despite having to make 2 prosthetic pieces I really wanted to do a run through of my whole design so I would know what I needed to fix or add to my final look. I am so glad I had done this even though my tutors questioned whether it was a good idea and maybe I should use that as my final, but I had added so much to help bring the look together.
I started of by applying my piece bit by bit so applying the prosaid to both sides a section by section, this was such a good idea when doing a big piece like I had done mainly because the sides didn't stick down to each other and it gave me a more precise application process.

I sort of like the way I applied the piece but some sections of it split from the baldez mainly because I think I made it too hard as I didn't put a great deal of deadner in it, so for my next one I am going to make the piece a lot softer so this wont happen. I also didn't apply it very straight so it has kind of bubbled near the eyebrow.


The colouring I am really pleased with and it's exactly the shade that I have hoped for but as my inital design asked for more than one prosthetic piece but I realised I cant do that I am going to build the forehead and block the eyebrows out using cinewax. I have used it before and although slightly awkward to use it does have a good effect. Obviously I am also going to the chest as my model is not actually wearing anything for his top half.
Things I am going to change for my final:
Make a softer piece
Apply the piece straight and not bent near the eyebrow
Block out the eyebrows either using wax or glue
Build up the forehead using wax
I started of by applying my piece bit by bit so applying the prosaid to both sides a section by section, this was such a good idea when doing a big piece like I had done mainly because the sides didn't stick down to each other and it gave me a more precise application process.

I sort of like the way I applied the piece but some sections of it split from the baldez mainly because I think I made it too hard as I didn't put a great deal of deadner in it, so for my next one I am going to make the piece a lot softer so this wont happen. I also didn't apply it very straight so it has kind of bubbled near the eyebrow.

The colouring I am really pleased with and it's exactly the shade that I have hoped for but as my inital design asked for more than one prosthetic piece but I realised I cant do that I am going to build the forehead and block the eyebrows out using cinewax. I have used it before and although slightly awkward to use it does have a good effect. Obviously I am also going to the chest as my model is not actually wearing anything for his top half.
Things I am going to change for my final:
Make a softer piece
Apply the piece straight and not bent near the eyebrow
Block out the eyebrows either using wax or glue
Build up the forehead using wax
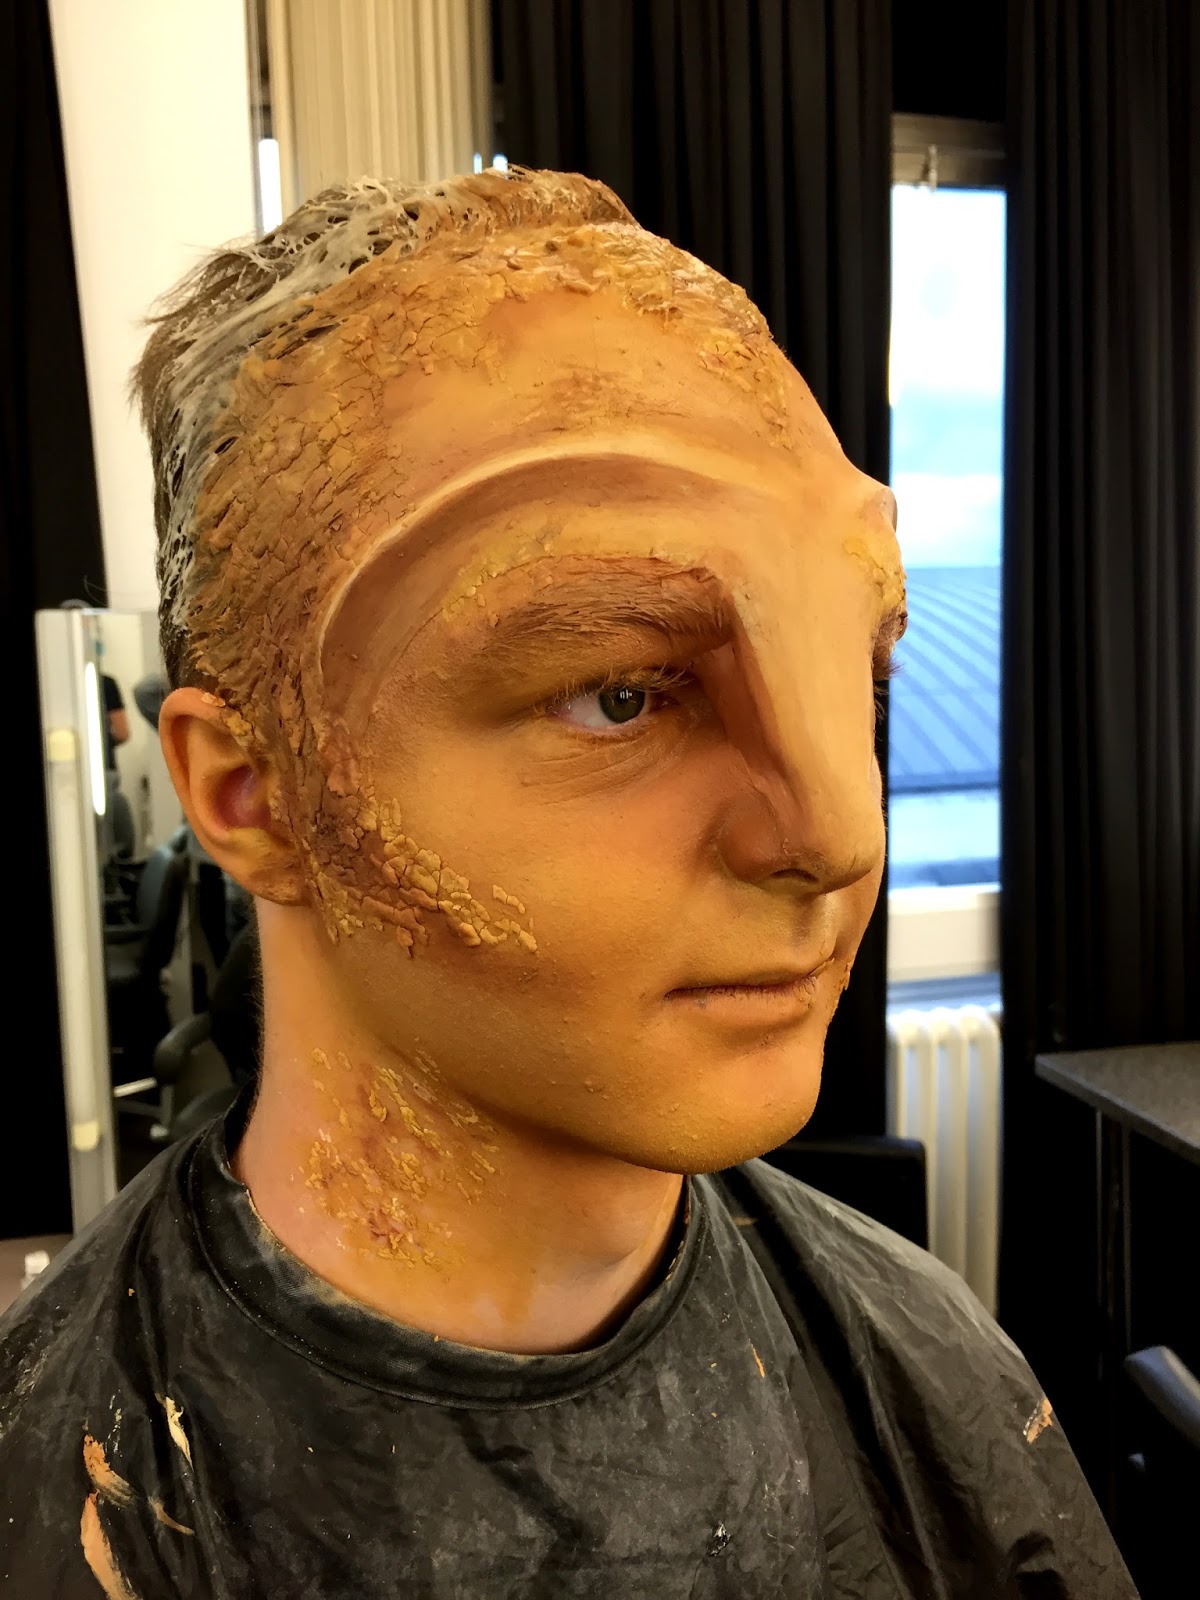
How To Use A Bald Cap.
I wasn't actually using this technique for my final look but thought it would be really useful to look into for future reference, none of the photos posted are mine but they are my class mates, I mainly put them on here so if I ever come back to it I'll have a visual reference point to look at.
Pre Impression caps you melt with acetone.
Rubber caps you blend with latex.
Watermelon you melt with alcohol.
1. Clean the models face making sure not to moisturise.
2. Wet all the hair and scrape back using gel in a criss cross shape at the back of the head.
3. When the hair is all scraped back apply the cap, using the models assistance.
4. Trim all around the cap just behind the ear and an inch or so away from the hair line.
5. Glue the edges down using prosaid or spirit gum.
6. When glueing the back down make sure the model has their head forward so the neck is stretched.
7. Melt the sides down using acetone.
8. If making them completely bald make sure you cancel out the dark tones in the hair by using a red/pink and then applying the foundation over the top.
BELOW PICTURES ARE NOT ANY OF MY WORK BUT I INCLUDED THEM FOR PERSONAL FUTURE REFERENCE IF I NEED IT.


Monday, 16 November 2015
Paint Job Practice On Myself
Before actually doing my full run through with the piece and everything I decided to try out the paint job first and the flour and water effect just to make sure my idea looks good. I have tried to paint out the pieces as much as I could so you could see a outcome that is going to be as similar as possible.


This is when I did the paint job and then added the flour and water, before it had started to crack. I think for my actual design I am going to use a more yellow tone on the face; this is too similar to a natural skin tone which is not what I want.


The photo to the left is just the face colour over the flour, some parts don't even have an colour on where as the one on the right I have colour adding more depth to it with darker tones in the cracks and lighter tones on parts of the crack to add some highlight.
Below is just a close up of the cracks from another part of my face. I am going to colour all the dry areas with darker in the creases and lighter areas, just brings more depth to it rather than it looking really flat and boring.

Sunday, 15 November 2015
Flour And Water VS Fullers Earth
I basically had to find a product that would help me represent my idea of dry desert like skin, I found 2 options, fullers earth and flour and water. I had no idea about the effect of either of them so decided to put them to a test and compare.
This was how they both applied: (Fullers earth is the darker one)

Then this is how they looked when they were both completely dry:

Fullers Earth:
 Fullers earth took the longest out the 2 to dry, in the end I had to hold a warm hair-dryer on it and even then, as you can see, it wasn't completely dry. I really like the effect but I don't think it fits in with my idea; the cracks seem to be too uniform and in straight lines rather than really random which is what I would have liked. Not only that I feel that it may be difficult to colour with the colour scheme that I am after as the grey tone will really mute my yellowy tones. The main factor for me not being completely satisfied with fullers earth would be the drying time is way too long and I would also need to colour it.
Flour and Water:
 This was more of the look that I was going for, this dried a lot quicker than the fullers earth and that was without a hair dryer, not only that but I had more freedom in creating what cracks I wanted and you had to move the skin underneath to create these cracks - this then resulted in being a lot more random and some sections came off etc. Also the base colour to this was a cream which would be so much easier to colour than the fullers earth would. I am going to use flour and water to create the dry effect on my model.
(UPDATE: Flour and water didn't work great on the hair - it didn't crack when it was drying, whereas fullers earth, although took ages to dry, worked a lot better and gave a similar effect on the hair to what the flour and water did on the skin)
This was how they both applied: (Fullers earth is the darker one)


Fullers Earth:

Flour and Water:

(UPDATE: Flour and water didn't work great on the hair - it didn't crack when it was drying, whereas fullers earth, although took ages to dry, worked a lot better and gave a similar effect on the hair to what the flour and water did on the skin)
Saturday, 14 November 2015

Making My Hybrid Mould + Silicone
For my bearded dragon I originally wanted to make a few pieces but have then come to realise that not only do I not have enough silicone but I cant overlay them and my idea was to cross them over. The piece that I went for in the end was the eyebrow and down the nose section, I measured my models face and then started on sculpting my design, below is how it looked before I cast it.

My first attempt of casting went awful, it was all going smoothly but the problem was when it came to mixing the silicones, I didn't mix them together enough so only certain areas set and some didn't, below is what my failed attempted looked like.

So, before I thought I didn't have enough silicone, now after having to remake my main piece, I REALLY didn't have enough silicone, never the less I got it done and below is my silicone mould with the piece actually setting in it. This time, both the mould and the piece came out well. The only issue is, is that I think I made my initial mould slightly wonky as some areas are a lot thinner than the other this became an issue when applying my piece and some of it split luckily this was only on my practice and when I made my second silicone piece I tried to keep as much as the silicone in that area when scraping over the top.


Bearded Dragon Design 2
Similarly to my first design I stuck with the same colour scheme but then started to look at a bearded dragons specific features and what truly defines them. Specifically the name... BEARDED. The reason that Bearded Dragons are give that name is because they have a lot of spiky scales under their mouth and when angered or when they are scared these scales get darker and the skin underneath them puffs out this is to show their dominance and too make themselves look bigger than they actually are which is such a common trait in any reptile and majority of animals.
To the left is an example of a bearded dragon doing so. In my first design I focused on mainly the head shape and the environment held a heavy influence on it as well with the cracking skin concept but this one I am looking at the texture.

Above is my face chart for this idea - as you can see the top portion of the face is very basic with only shading used and blocking out the eyebrows. Where as my prosthetics piece for this one would be all the spikes. If I was to chose this design I'd have to decide where I would be making one big piece that can fit around the neck and that has the spikes on or I'd individually make all the spikes and then the chin extension to smooth it out. In regards to the amount of silicone I have I think my best bet would be to make one big one that wraps around the neck and onto the chin, I would have to find a very big surface to work on and make sure I get all my measurements right when measuring my model otherwise all my hard work would be ruined. I would like to keep the colours the same as in my first one, even though you cant really see this in the picture, the only change would be the neck to be darker and slightly more orange as some beardies turn orange, the spikes will also be black gradient that blends into a more browny orange tone.

For the body I wanted it to be basic and carry on with the spiky scales but get less and less dense as it goes down the chest, same again with the colours. I want it to be dense and dark where the majority of scales are but as soon as they get less and less I wanted the colour to fade to the natural colour of the lizard which is going to be a tan yellow colour same as the design before.

The hair chart needs a lot of explaining as I feel it is quite difficult to understand. I basically want it to simulate the spiky scales on the neck and face but obviously I cant stick prosthetics to the hair as it will rip it out and be a pain for my model to get it out. So, I don't know how or if this is going to work and if it is going to look good or not but if I chose to do this design I will have to figure out this, but basically my models hair is going to be slicked back at the front and then I want to create small spikes with his hair, if it possible and if the length is correct. Also my model has blonde hair so I would then have to colour the tips of his hair black and then fading into his natural colour which is very similar to the colour which his skin will be.
Anyway I don't think I am going to do this design mainly because I think the silicone piece wont work as well as my other design. I also think this will look too human like rather than reptilian, where my other design I am trying to change the shape of his whole face and head which will be a drastic change to the human aspect that he obviously has.
 |
| http://www.kalrissanrotts.com/ Lizbeth%20dec%2010%2007.jpg |
To the left is an example of a bearded dragon doing so. In my first design I focused on mainly the head shape and the environment held a heavy influence on it as well with the cracking skin concept but this one I am looking at the texture.

Above is my face chart for this idea - as you can see the top portion of the face is very basic with only shading used and blocking out the eyebrows. Where as my prosthetics piece for this one would be all the spikes. If I was to chose this design I'd have to decide where I would be making one big piece that can fit around the neck and that has the spikes on or I'd individually make all the spikes and then the chin extension to smooth it out. In regards to the amount of silicone I have I think my best bet would be to make one big one that wraps around the neck and onto the chin, I would have to find a very big surface to work on and make sure I get all my measurements right when measuring my model otherwise all my hard work would be ruined. I would like to keep the colours the same as in my first one, even though you cant really see this in the picture, the only change would be the neck to be darker and slightly more orange as some beardies turn orange, the spikes will also be black gradient that blends into a more browny orange tone.

For the body I wanted it to be basic and carry on with the spiky scales but get less and less dense as it goes down the chest, same again with the colours. I want it to be dense and dark where the majority of scales are but as soon as they get less and less I wanted the colour to fade to the natural colour of the lizard which is going to be a tan yellow colour same as the design before.

The hair chart needs a lot of explaining as I feel it is quite difficult to understand. I basically want it to simulate the spiky scales on the neck and face but obviously I cant stick prosthetics to the hair as it will rip it out and be a pain for my model to get it out. So, I don't know how or if this is going to work and if it is going to look good or not but if I chose to do this design I will have to figure out this, but basically my models hair is going to be slicked back at the front and then I want to create small spikes with his hair, if it possible and if the length is correct. Also my model has blonde hair so I would then have to colour the tips of his hair black and then fading into his natural colour which is very similar to the colour which his skin will be.
Anyway I don't think I am going to do this design mainly because I think the silicone piece wont work as well as my other design. I also think this will look too human like rather than reptilian, where my other design I am trying to change the shape of his whole face and head which will be a drastic change to the human aspect that he obviously has.
Bearded Dragon Design 1
 This is the design that I am going to create, mainly because the shape of its head really influenced my prosthetic piece design in comparison to my other ideas. I also really liked the fact the prosthetic nose section gives the illusion that the eyes are really far apart similarly to a bearded dragon. Originally I was going to chose the frilled neck lizard but decided against it mainly for the fact I wasn't using any inspiration to its main feature, its neck, but mainly the colours and texture. However, I really fell in love with incorporating the warm browns and sandy yellows of a bearded dragons skin tone into my design. Not only that but I took inspiration from the ecosystem that they come from by trying to
 translate the dryness and the cracks of the desert floor using fullers earth so it cracks over the skin. I tried to stay away from trying to portray the texture of a lizard onto the skin mainly because it seemed quite generic but when I practice my design I may try it out and see what it looks like.

As you can see there is going to be certain areas of the face and body that will have fullers earth on to give the illusion of dry mud soaked cracking skin, the fullers earth will also be spread in the hair to give the illusion of slicked back hair. I chose not to do a bald cap mainly because the fullers earth mixed in with the hair would give an interesting texture. My model is male so he will be posing topless which then means I will have to consider making up his torso for the picture.

I am definitely going to chose this as my design as I like the fact I incorporated an element of the environment that a bearded dragon lives in rather than just the actual bearded dragon itself.

The cracked effect didn't quite come out the way I had desired it to but I do know it worked because I did this hair chart after I had done my look, mainly because this was not my original design as I was going to use flour and water but it didn't crack on the hair, instead I had to use fullers earth which is what is on the paper right now. The colour from the head and nape of the neck was dragged over to give it a slight tint not a full on colour which was what my original design was going to be. I had to give up on this idea because it would have been a lot of work to colour the fullers earth white and then colour it to the way I want it. Either way even though I had to completely change the hair design I think I much prefer it, it added a cool tone to my look which it needed but I was unaware that it needed it until I added it.
Anatomy, Skeletal And General Info Of A Bearded Dragon
Bearded Dragons in the wild will live to a maximum of about 5 years, however dragons that are kept in captivity as pets can usually survive for around 7-10, this is being increased as there is more advance ways of taking care of them. Trying to determine the sex of a bearded dragon is actually very difficult, it has nothing to do with head or body size but rather certain lumps in certain places - luckily I wouldn't have to try to consider this when I was designing as my main idea is based on the head shape. The main reason they have the name 'Bearded Dragon' is because of the small spiky skin underneath their mouth, this inflates and becomes darker when the dragon wants to show dominance, this is another idea that I explored because it was a key feature to a bearded dragon. A head bob is also used to show dominance and try and win over a mate - these are usually around their mating season, captive dragons don't have a mating season but will still continue to do these things at inanimate objects if they see them as a threat. To show submission a dragon will slowly wave one arm as though they are saying goodbye.
Vision - Beardies have a very good sense of vision, and because their eyes are on the side of their head they have a lot wider field but their depth is very bad.
Hearing - They have small holes on either side of their head which they hear from, nothing blocking these results in great hearing.
Touch - The scales on a dragons tummy help him feel vibrations not only that but when it rains water is collected between the spikes and it is then dribbled to the mouth.
Taste - The tip of their tongue is adhesive, this helps them get food from a distance just by sticking out their tongue, Their sense of taste is also a lot more advanced from us humans, they also use their mouth to cool themselves down by just holding it open.
Smell - Again, beardies use their mouth to smell, similarly like snakes, they use their tongue.
Parietal Eye - This could technically be called their third eye, there is a slight spot on top of their head and in between their 2 normal eyes this 'eye' sense heat and shadows which is also a warning device to them from their main predators which are birds. It also helps them to bask.
When designing my bearded dragon look I wanted to see what they're skeletal system looked like as one of my main features that I am focusing on is their head size and shape. Below is a pretty general diagram for a lizard which also applies to the bearded dragon species.
Although I am not looking at any of this in depth it was just quite interest to read about and take some of it into consideration when I was designing my look. (Except I found none of it a source of inspiration which is then why I moved on to the skeletal system of a bearded dragon rather than their anatomy)
I started to then look at a bearded dragons skull shape and a close up of their face to get more of an inspiration. The main shape of the skull is above the eyes, the skull seems to go a lot wider around the top, almost like a triangle shape - this is the aspect that I would like to try and recreate. I don't think I am going to be able to create all of the pieces I would like to out of silicone so I will have to find another way to build up the forehead and eyebrows of my model.
http://beardeddragoncaresheet.weebly.com/general-info.html
Vision - Beardies have a very good sense of vision, and because their eyes are on the side of their head they have a lot wider field but their depth is very bad.
Hearing - They have small holes on either side of their head which they hear from, nothing blocking these results in great hearing.
Touch - The scales on a dragons tummy help him feel vibrations not only that but when it rains water is collected between the spikes and it is then dribbled to the mouth.
Taste - The tip of their tongue is adhesive, this helps them get food from a distance just by sticking out their tongue, Their sense of taste is also a lot more advanced from us humans, they also use their mouth to cool themselves down by just holding it open.
Smell - Again, beardies use their mouth to smell, similarly like snakes, they use their tongue.
Parietal Eye - This could technically be called their third eye, there is a slight spot on top of their head and in between their 2 normal eyes this 'eye' sense heat and shadows which is also a warning device to them from their main predators which are birds. It also helps them to bask.
When designing my bearded dragon look I wanted to see what they're skeletal system looked like as one of my main features that I am focusing on is their head size and shape. Below is a pretty general diagram for a lizard which also applies to the bearded dragon species.
 |
| http://img.photobucket.com/albums/v299/waldo_20012001/ anatomy.jpg |
Although I am not looking at any of this in depth it was just quite interest to read about and take some of it into consideration when I was designing my look. (Except I found none of it a source of inspiration which is then why I moved on to the skeletal system of a bearded dragon rather than their anatomy)
 |
| http://www.thereptiledungeon.freeservers.com/mvc-273f.jpg |
I started to then look at a bearded dragons skull shape and a close up of their face to get more of an inspiration. The main shape of the skull is above the eyes, the skull seems to go a lot wider around the top, almost like a triangle shape - this is the aspect that I would like to try and recreate. I don't think I am going to be able to create all of the pieces I would like to out of silicone so I will have to find another way to build up the forehead and eyebrows of my model.
http://beardeddragoncaresheet.weebly.com/general-info.html
Chris Walas & Brian Wade - 'Enemy Mine' (1985)
Even though I previously looked at one of the most iconic prosthetic based films around I wanted to look at how other directors and make up artists used my idea of a lizard and then made it into a hybrid character.
 Chris Walas and Brian Wade are the creators of the creatures called 'Dracs' in the film 'Enemy Mine'. The basic story line is about the constant war between the humans and the Dracs - a reptilian like creature that is similar to us humans. Willis Davidge, the main character then crashes onto a planet along with a Drac, they then leanr to cooporate and work to together to try and survive.
It was interesting to look at a completely different route to using a reptile as a source of inspiration, Chris Walas (the main man behind the appearance of the Dracs) was to go down a more sci route due to the genre of the film, whereas I could potentially go down any route that I might find interesting.
These masks were originally made out of rubber and reapplied every time they were needed.
Below is a close up of one of the Dracs, I feel like Walas mainly focused on the texture of a lizard rather than the shape of the head,
although saying this I really love the shape that
has been created especially at the back of the head. The look as a whole I think is incredible and you can really see where the inspiration for this character has come from. The only criticism I have would be the odd line around the mouth, I don't know where this is relating to something in regard to the design of a certain type of reptile but I just feel it makes it look like an obvious mask whereas if that line was seamless I think it could have brought a sense of realism to the characters.
 Chris Walas and Brian Wade are the creators of the creatures called 'Dracs' in the film 'Enemy Mine'. The basic story line is about the constant war between the humans and the Dracs - a reptilian like creature that is similar to us humans. Willis Davidge, the main character then crashes onto a planet along with a Drac, they then leanr to cooporate and work to together to try and survive.
It was interesting to look at a completely different route to using a reptile as a source of inspiration, Chris Walas (the main man behind the appearance of the Dracs) was to go down a more sci route due to the genre of the film, whereas I could potentially go down any route that I might find interesting.
These masks were originally made out of rubber and reapplied every time they were needed.
Below is a close up of one of the Dracs, I feel like Walas mainly focused on the texture of a lizard rather than the shape of the head,
although saying this I really love the shape that
 |
| http://aliens.wikia.com/wiki/Drac |
John Chambers - 'Planet Of The Apes' (1968)
John Chambers - the man behind the 'Planet Of The Apes' (1968) a very clear example of a human hybrid. The human like body and behaviour but a very realistic (for the time it was created) Ape like physique and appearance.
Despite this not linking to any of my ideas I thought it would be interesting to look at as Chambers sparked a revolution in the make up sfx world with the creation of his ape masks, not only was he a strong point of inspiration but he also created products that we use today. For example, paint that doesn't crack, foam latex which allowed heat and moisture through and an adhesive that dries matte.
One of the many impressive features to Chambers ape work was the fact he could change the actor so radically yet the original features and facials expressions were still noticeable. Looking at his work from a perspective of someone that is in the 21st century and has a lot wider access to materials and equipment that were not available back then, the whole concept and application is very futuristic and possibly at the standard that many artists in this day are now working towards. He is an important person in the make up industry as well as a very important influence to this project - he is able to create something so animal like yet you can tell that it still has human form that has characteristic from its ape ancestors and evolutionary features that have developed in result of the environment that they come from.
http://www.telegraph.co.uk/news/obituaries/1340456/John-Chambers.html
 |
| https://illmindoflucy.files.wordpress.com/2015/03 /ny-bb075_nyapes_g_20110707162142.jpg |
One of the many impressive features to Chambers ape work was the fact he could change the actor so radically yet the original features and facials expressions were still noticeable. Looking at his work from a perspective of someone that is in the 21st century and has a lot wider access to materials and equipment that were not available back then, the whole concept and application is very futuristic and possibly at the standard that many artists in this day are now working towards. He is an important person in the make up industry as well as a very important influence to this project - he is able to create something so animal like yet you can tell that it still has human form that has characteristic from its ape ancestors and evolutionary features that have developed in result of the environment that they come from.
http://www.telegraph.co.uk/news/obituaries/1340456/John-Chambers.html
Monday, 2 November 2015
Australian Outback (Arid Regions)
Rather than picking an ecosystem to study I chose to choose the reptile I wanted to look at and then research into the environment attached to it. I had a mate whos always had a thing for lizards, I guess you could call it a hobby, he mainly inspired my choice of character - I feel like if you like an animal as much as he does and also own a few different species of lizards then they must be pretty cool. Anyway, I did my research into lizards (and asked him for his favourites) and the majority were situated in the Outback, so this is what I have chosen.
 |
| https://upload.wikimedia.org/wikipedia/commons/4/43/Outback.JPG |
Specifically I am going to look at the arid regions, the part where there is very little moisture and rain and the vegetation is limited. I chose the be specific in my research mainly because the australian outback is HUGE and there is a variety of climates within it like a rainforest for example where the tropics are very wet and rainfall much more common. This area is dry and hot, just the right climate for my lizards to live.
Below are the lizards that I have chosen to specifically look at, eventually I am going to chose 1 but each one is going to help influence a design idea and maybe all would contribute to the final look.
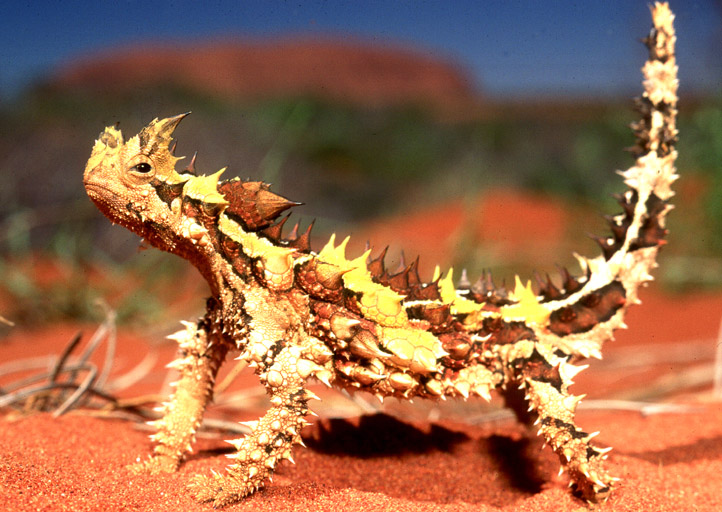
THE THORNY DEVIL
 |
| http://www.genesispark.com/wp-content/uploads /2011/11/Thorny-Devil.jpg |
The texture was key thing that I looked at in this lizard, it would be interesting to recreate these spikes and even the colours.
BEARDED DRAGON
 |
| http://i.dailymail.co.uk/i/pix/2015/07/01/21/145956BC000005DC -0-image-a-17_1435782708094.jpg |
Despite these being quite boring and uninteresting to look at I personally really liked the protruding lumps above the eye.
FRILLED NECK LIZARD
 |
| http://epicful.com/wp-content/uploads/2015/05/frill-necked -lizard-animals-lizards-reptiles-223973-2451x3543.jpg |
This goes without saying really, the whole concept if these is interesting to look at from the colour to the texture of their scales and the shape they form.
CHAMELEON
 |
| https://amazingpict.com/wp-content/uploads/2015/ 01/chameleon-green.jpg |
Although no necessarily native to Australia they are still a resident there. The shape of their head really interested me and the small spike underneath their mouth intrigued me.
Subscribe to:
Comments (Atom)